Unit 9 Lesson 4 Dilations
Unit 9 Lesson 4: Dilations

Lesson Overview
Dilations
What You Will Learn

- dilating (enlarging) geometric figures
Overview
In this lesson, you will learn how to dilate geometric figures. You will show your learning by enlarging or reducing the size of figures.
Essential Understanding
You can use a scale factor to make a larger or smaller copy of a figure similar to the original.
- Read pages 402-408 in your course textbook
This course is based on a textbook that is viewable by clicking on the textbook icon. Keep the textbook open while you go through the lesson so that you may refer to it throughout the lesson.
Lesson 4: Dilations
Resource Video (Dilation Images)

Proceed to the Next Page
Prepare for Application
Instructions

You have now studied Perpendicular and Angle Bisectors. It is now time to demonstrate your learning.
Try the activities below on your own. You should be able to answer these before beginning the practice.
Create an extra journal called 'Unit 7: Lesson 5 activities' and do these in your journal.
Activity 1
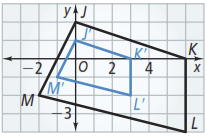
In the figure below, J'K'L'M' is a dilation image of JKLM. The center of dilation is O. Is the dilation an enlargement or a reduction? What is the scale factor of the dilation?
Activity 2
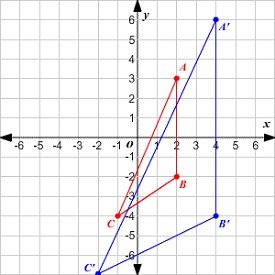
Use the figure below for questions 1-2.
- What are the images of the vertices for a dilation with center (0, 0) with a scale factor ? Graph the image of and label it .
- How can you prove using a postulate or theorem from Unit 7?
Activity 3
The height of a document on your computer screen is 20.4 cm. When you change the zoom setting on your screen from 100% to 25%, the new image of your document is a dilation of the previous image with a scale factor of 0.25. What is the height of the new image?